Showing posts with label Oriental. Show all posts

Friday, March 21, 2025

PAD KRA PAO.- Thai Basil Stir Fry... A must for your recipe collection!!


       PAD KRA PAO.- The most iconic dish and favorite street food in Thailand!... This Thai Basil Stir Fry can be made with protein, vegetarian or vegan. It can be a main dish or a side one, anyway you like it, spicy or not, juicy or not, your family's special ingredients and done in a flash!...

Don't be taken aback by the ingredients, these are the basic ones needed for a Thai kitchen, so if you like Thai food you'll be using them over and over... 

A very easy dish to prepare, just follow the steps and you'll see the changes you can make, the ingredients you can add or remove and produce a wonderful meal for your family.

To prepare this, you'll need:

10 oz protein, your choice, raw or cooked - in small spoon size bites
2 tsp Fish Sauce
1 Tbls Oyster Sauce
1 Tbls Soy Sauce
2 Tbls water
2 tsp sugar, or more according to your taste
1-5 Thai Chilies or the chilies you like or have
5-8 Garlic cloves
1 Tbls Ginger - grated or chopped fine
1/4 cup mild red chilies, red bell pepper, capsicum, chopped
1/2 medium onion, small dice
1 1/2 cup Basil Leaves
Vegetable oil as needed
Eggs - 1 per serving
Jasmine Rice or whichever you have - to serve along with

1-    Make the sauce by combining oyster sauce, soy sauce, fish sauce, black or dark soy sauce, sugar, ginger and water. Stir until the sugar is completely dissolved.
2-    Pound the Thai chilies into a fine paste in a mortar and pestle, then add the garlic and the mild chilies, ginger and pound into a rough paste, just until there are no more big chunks.
3-    If using raw protein, heat a wok or a skillet until very hot on high heat, add just enough oil to coat the bottom and add the protein, spreading the pieces out into one layer. Let them sear until browned on the underside, then give it a toss and stir until it’s done. This should only take a few minutes in total. Remove from the pan. Note: You can skip searing the protein and just add it to the wok raw, but the browning does add a nice flavor.
4-     In a wok on medium-high heat, add the chili garlic mixture and stir until the garlic starts to turn golden, about 2 minutes. Add the onions and cook it for 30 seconds to a minute to soften slightly. 
5-     Turn the heat up to high and add the protein and the sauce, and toss everything together just for 30 seconds or so, until the meat is well coated and heated through. If you didn’t pre-cook the protein, take your time and keep tossing until it’s cooked through.
6-    Turn off the heat, add the basil, and toss just to wilt.
7-    Make the fried eggs if you wish, and serve the stir fry with jasmine rice and topped with a fried egg

I hope you will try this dish and see why we love it! The flavors are classic and unmatched! Also an economical dish to prepare and serve.


Monday, April 17, 2023

Vietnamese Baked Chicken - Such a wonderfully flavorfull Chicken!!


 Vietnamese Baked Chicken.-  You'll appreciate the results of this recipe, the flavor is truly wonderful. You'll also appreciate the easy prep to get it done... Plus it's flexible too and I'm planning on using the marinade on Beef to make Satays, Fish, Seafood, Pork YAY!!

Let me tell you what you will need to prepare it:

        2 pounds (900g) bone-in, skin-on chicken thighs

    • 1/4 cup (60ml) soy sauce

    • 1/4 cup (60ml) Asian fish sauce

    • 1/4 cup (55g) palm or dark brown sugar - I also use white

    • 2 tablespoons (30ml) grapeseed or other neutral oil

    • 2 packed tablespoons (7g) fresh cilantro leaves and tender stems, finely chopped

    • 1 1/2 tablespoons (20ml) fresh juice from 1 lime

    • 1 teaspoon (5g) finely grated zest from 1 lime

    • 1 tablespoon (10g) minced peeled fresh ginger

    • 2 teaspoons (10ml) hot chile paste (sambal oelek)

    • 3 medium cloves garlic, minced or grated (about 2 teaspoons)

    • Sliced limes and cilantro leaves, for garnish

Directions

    1. Place thighs in a large zipper-lock bag. In a medium bowl, whisk together soy sauce, fish sauce, sugar, oil, cilantro, lime juice and zest, ginger, chili-garlic paste, and garlic. Pour marinade into bag with chicken, seal bag, and toss to coat well. Let chicken marinate for at least 30 minutes and up to 4 hours. I recommend 4 hours.

2. Preheat oven to 425°F (220°C) and set oven rack to middle position. Line a rimmed baking sheet with foil and place a wire rack on top. Remove chicken from bag, allowing marinade to drip off, and set on wire rack skin-side up, making sure to leave space between thighs.  

Bake until thighs register 155 to 160°F (68 to 71°C) on an instant-read thermometer, about 35 minutes. (Be sure to measure temperature in the center of the thickest part of the thighs, but not directly against the bone.) If chicken skin is not brown and crisp enough by the time the thighs are cooked through, set broiler to high and broil until browned and crisp, about 1 minute, being careful not to burn the skin. Transfer chicken to a platter and let rest for 5 minutes. Garnish with lime slices and cilantro, then serve.

NOTE:  I have used the leftover marinade as a finishing glaze, either just reduced or with an addition of honey (for the glaze shine) plus a little sweeter is yummy. But you can add more chili sauce, lemon to pump up the flavor.

You can also make this in an Air Fryer instead of a conventional oven. I use the same time to cook but keep an eye on it. Once at temperature (see above) I insure the charred bits are the way I like, if not I put it back and Airfry it for another 5-6 minutes until it gets the color desired.


Monday, February 27, 2023

Hong Kong Soy Sauce Chicken.- This is the Michellin Star Restaurant's Recipe from Singapore!!

HONG KONG SOY SAUCE CHICKEN.-  This is the recipe from the Michellin Star Restaurant in Singapur hailed all over for the wonderful flavor! The recipe and photos are from the original stand in Singapore!...

This is actually an easy preparation, just takes a while, but you will be rewarded with very juicy and flavorful Chicken. This preparation makes the skin shiny and dark brown while the meat absorbs the flavors!

The ingredients you will need: (In Mexico, Mercado LIbre, gets all supplies): Also in Chinese, Japanese & Corean Markets:

This recipe is for a small chicken, no larger than 1 K. This is due to the size of pots they had. If you have a larger pot you can use a larger chicken, adjust ingredients for this larger size.

1 Chicken, Whole

1 cup Dark Soy Sauce

1/2 cup Light Soy Sauce

1 Tbsp Sesame Oil

1 Tbsp Chinese Cooking Wine - Shaoshing or other

1 Tbps Black Vinegar

4 cups Water

Vegetable Cooking Oil, as needed

8 Tbsp Brown Sugar

5-6 Star Anise

10-12 Cloves

2 Cinnamon Sticks

1/2 - 1 tsp White Pepper or to taste

8 -10 Garlic Cloves

3 pieces Ginger, about 2" each

Spring Onions

Parsley


1.- Heat up the wok. Saute the garlic, ginger, star anise, cloves and cinnamon in a little hot oil over low hear until their aroma is released.

2.-  Add the dark soy sauce, light soy sauce, black vinegar, cooking wine, sesame oil and water to the work. Bring to a boil.


3.-  Add the brown sugar. Add a dash of white pepper for taste. 

4.-  Bring the mixture to a boil. Taste it, you can add soy or brown sugar until you get the desired savouriness and sweetness is achieved.

5.-  When the taste is correct, transfer the mixture from the wok to a stock pot. Once more, bring it to a boil over high heat. 

NOTE: If you don't have a wok, use a stock pot from the beginning and proceed as shown.

6.-  Gently lay the chicken into the boiling liquid, with the breast facing down.

7.-  Keep it at high heat to bring it back to a boil. Should be bubbling and churning inside the pot.

8.-  Turn the chicken over with breast facing up. The cavity should be completely full of the liquid and the leg join at the hip should be under liquid as well. Top up with boiling water if necessary to keep the bird fully submerged.

9.-  When the pot is bubbling steadily, turn off the heat and place a well fitting lid on the pot.

10.-  Now leave the chicken to poach in the hot liquid for about 40-45 minutes. If you're using a larger bird, give it some extra time. You can use an Instant Read Thermometer to insure the correct temperature.

11.-  After 30-40 minutes, check the temperature. If it's done, remove the chicken. If not, then keep it in the hot soy liquid for a while longer. Check temperature again.

12.-  Once done place the chicken on a cutting board and cover with foil to rest about 10 minutes and allow it to cool a little so you can cut it up.

NOTE:  The liquid stock can be reused. You can freeze for a later use too. Just needs some additional water and once you taste it you will be able to tell if more spices and sauces should be added. 

This is the actual stall at the Singapur Hawker Market.... An amazing place!


Hong-Kong-Soya-Sauce-Chicken-Recipe

Hong-Kong-Soya-Sauce-Chicken-Recipe

Tuesday, July 12, 2022

Sweet & Sour Pork (Chicken, Shrimp).- Not red and not the same old dish....


 Sweet & Sour Pork (Chicken, Shrimp) .- An old favorite in those Chinese Restaurants you see in the movies with a dish of Sweet & Sour Pork, with it's characteristic neon red sauce. This is not that one, instead a rich combination of spices and veggies that come together for a fantastic meal.

This is a simple recipe to prepare and can also be prepared in advance and in parts to be brought together at dinnertime. On this occasion I used Pork Leg, boneless but you can use whatever you have like riblets, fatty meat, cut into bit size chunks. You can use chicken, cut up, pre-cooked chicken wings, shrimp (just be sure to put in at the end so it doesn't overcook)

To prepare Sweet & Sour Pork you'll need:

500-600g Pork meat, cut into bite sized cubes

1 Tbsp Soy Sauce

1 Garlic Clove, finely grated

1/2 tsp Ground Black Pepper

1/3 cup flour

2 tsp vegetable oil (you'll need more for frying)

1 onion, diced

1/2 Red Bell Pepper, diced

1/2 Green or Yellow Bell Pepper, diced

100g fresh Pineapple, diced

4 Spring Onions, trimmed, cut in batons

Rice to serve

Sweet & sour sauce:    


½ cup brown sugar

3 tbsp white vinegar

2 tbsp tomato ketchup

1 tbsp light soy sauce

1/3 cup pineapple juice

¼ tsp Chinese five spice

2 tsp corn flour (cornstarch) mixed with 2 tbsp water

STEPS TO PREPARE.-

1.-    Put meat in a bowl. Add Soy Sauce, garlic and pepper and mix well. Let rest for 30 minutes while you prepare the other parts.

2.-    Make the Sweet & Sour Sauce: In a saucepan, put the brown sugar, vinegar, ketchup, soy sauce, pineapple juice and Chinese Five Spice over Medium heat. Simmer for about 5 minutes so the sugar is well dissolved. Place the cornstarch/water in a glass and mix. Once the sauce starts bubbling, add the cornstarch slurry and stir 2 minutes more and it will thicken. Remove from the heat until ready to use.

3.-    Cooking the pork.- Fill a wok with about 2 inches of oil, you can use any heavy pan, bring it up to temperature 180 C. While oil is heating up, toss the pork with the flour so it's well coated and begin to cook, in batches so you don't overcrowd the pan. 3-4 minutes or until golden brown. Put on grate or paper towel.

4.-    In a clean wok or frying pan over high heat, add the oil and stir-fry the onion for a minute or two. Add the Peppers and continue to stir-fry. Now add the pineapple, make sure it's touching the surface of the pan so it will get charred bits. Mix everything well. Now is time to add the Sweet & Sour Sauce and again, mix well. Serve.

I hope you will try this recipe, you'll see how easy it is to prepare and the wonderful flavor that will please you're whole family.

NOTE: Just like you can change the type of protein to use, you can use many other types of vegetables in the mix as well. For hard vegetables simply par cook them first i.e.: carrots


Wednesday, August 18, 2021

Thai Spicy Basil Fried Rice.- One of my all time favorite dishes that brings me good memories and super flavor!!!

 Thai Spicy Basil Fried Rice.- This dish not only brings me wonderful memories but the flavor is so amazing that it's become one of my family's favorite too. Very easy to make, fast to prepare and brings a lot of flavor. 

Another thing I love about this dish is that it can be made with any type of protein you like or you can make it without animal protein, you can add veggies or change them around, plus you can take advantage of delivery white rice, that dry white rice that most people toss but for this is just perfect. I usually make plain white rice, leave it uncovered in the kitchen so it gets cold so you can use it later in the day, if it's dry it's fine. You will add flavors and sauce later and you will be amazed.

Here is what you'll need to prepare it:        


3 Tbl Oyster Sauce

2 Tbl Fish Sauce

2-3 Tbl sugar (more or less according to your taste)

1/4 - 1/2 cups oil (can be vegetable, peanut or sesame)

4 cups dry white rice

6 Cloves Garlic, crushed or press

2-3 Serrano Peppers, seeded and cut into fine strips (depends on heat level)

* Proteins: Cup of shredded chicken, pork, steak, shrimp, fish, tofu, etc. It's best if you cook these beforehand or use leftovers. You can also do without.

1 Red Bell Pepper, seeded and cut into thin slices (or green or yellow, your choice)

1 small Onion, thinly sliced (I like Green Onions, white and green parts separate)

1-2 cups Basil Leaves, cut in Chiffonnade, thin strips

1/2 Cucumber, peeled and sliced in small batons

1/4 cup Cilantro Sprigs

1-    Whisk together the Oyster Sauce, Fish Sauce and Sugar and reserve

2-    Over medium-high heat, heat the oil in a wok / cast iron / large pan until the oil begins to smoke.

3-    Add the garlic, Serrano Peppers, stirring quickly. Then add the protein you've chosen, onion, red bell pepper and the Oyster Sauce mixture and mix well. 

4-    Turn the heat to high and add the rice. Stir quickly so the rice breaks up and gets covered by the sauce and everything is well blended. Break up any rice that has stuck together with the back of a spoon. Keep tossing the rice and ingredients to heat really well and combine. 

5-    Remove from the heat and add the Basil Leaves. Garnish with the cucumber and cilantro for serving.

Saturday, July 10, 2021

Chinese Style Braised Pork Riblets.- Such a lovely, easy dish!

 Chinese Sticky Red Pork Riblets.- I ordered BBQ Ribs but I received little riblets so I needed to adjust my plans and came up with this little concoction from pantry items, really easy and it came out excellent!

To make this you'll need:

1 Kg Pork Riblets or small Pork Ribs

2 tblsp oil

2 tblsp brown sugar (If you don't have any use regular sugar)

2 tblsp Soy Sauce

2 tblsp Woscestershire Sauce (I wanted dark soy sauce but haven't been able to find it)

3 tblsp White Vinegar

2 tblsp White Wine (again, I didn't have any Chinese Wine)

1/4 cup water

2-3 slices fresh Ginger, peel and slice fine

2 Green Onions (scallions) white and light green part only, sliced fine(save the green parts)

3 Garlic Cloves, peeled and bruised, so not cut but pressed down with the knife

2-3 Green Onions, green part only, sliced as a topping when serving

1 tblsp Sesame Seeds, as a topping when serving

TO BEGIN.-

1-    Rinse the riblets under water and place in a pot, cover with cold water and bring to a simmer over high heat, to bring out impurities in the meat, simmer for about 3-4 minutes while you skim the water of the foam, then drain the water and ribs. Transfer the ribs to a bowl, cover with water to rinse. Drain ribs again.

2-    Put the oil in a pot and add the oil over medium-high heat and now add the sugar. Mix and don't allow to burn. Once it begins to get a golden brown color you add the ribs so the caramel will adhere to the ribs and the sugar is a thick sauce.

3-    Now add the rest of the ingredients shown up through the garlic. Mix to combine well, put the lid on the pot over medium-low heat and simmer gently. You are braising the meat so you let it cook about 25 minutes and stir a couple of times during that time.

4-    Take the lid off the pot and raise the heat to medium and allow the ribs to bubble for another 10-15 minutes and when the sauce sticks to the ribs and you see some oil on the bottom of the pan. Check the ribs to insure they are tender, once done place the ribs on a serving dish, top with the scallions green tops and sesame seeds. Serve warm. Enjoy!!

As you can see this is an easy recipe and even when you substitute ingredients, the results are really great!! I made some Cole Slaw and White Rice to serve along side and can guarantee our dinner will be lovely!

NOTE: I am always trying to improve the recipes and this other time (today) I pre-cooked the riblets in my pressure cooker for about 20-25 minutes to insure they were tender. Take them out of the pot and set aside while you go to Step 2 and begin the process. This makes it a very easy and fast process but feel free to cook it as you prefer.


Thursday, April 4, 2019

SWEET & SOUR CHICKEN: A classic that's worth re-visiting....

SWEET & SOUR CHICKEN: A classic of Chinese Restaurants from our youth, brings back good memories of the Mi Kin Low Cafe in Tijuana, Mexico. Did you know Mexico is known for good Chinese Food? Yup, it's a fact, but we have all nationalities very well represented too!

Been on an Asian kick for some reason, might be the fact that for all the great food here in Merida, Yucatan (we have some absolutely divine Sushi places here) but THERE IS NO GREAT CHINESE FOOD! The best is supposed to be PF Chang's (yes, really). Now I'm not knocking PF Chang's, it's good but it's not Chinese. it's an American chain restaurant, and while American chains are much better here than in the US due to their using less processed foods and do actual cooking, that results are fresher and just better quality. Good for us, but I still refuse to eat McDonald's ugh.

Anyhoo, asked Rene and he suggested something like this and it took me on memory lane and while the recipe is a little bit involved, it's not hard to make at all and the results are worth it. Much better than take-out too and cheaper, since I had all the ingredients, why not.

I had two large double breasts, bone-in that I used for this. What I usually buy since I can easily de-bone them and will have the carcass to use when making stocks. Works for me. The breasts were so large that I split them in half  lengthwise and then cut then into strips and then into cubes about 1 inch in size. Since it was twice as much as called for, I doubled everything, ok?

You will need:

8 oz boneless, skinless chicken breast, in cubes
1 Tbls white wine or Chinese Shaoxing wine

For the strir-fry:
2 cloves garlic, finely chopped
1/2 Green Bell Pepper, cut in cubes
1/2 Red Bell Pepper, cut in cubes
1 tomato, small, cut in wedges
1 scallion stalk, cut in fine pieces
1 celery stalk, cut in small portions
1-2 cups Pineapple, in chunks

Oil for frying

For the batter:
4 Tbls all-purpose flour
4 Tbls corn starch
1/2 cup water
1/2 tsp baking powder

For the glaze:
3 Tbls catsup
2 Tbls Chinese chili sauce  or your choice
1 tsp Hoisin Sauce (Plum Sauce)
1/2 tsp Worcestershire Sauce
1 tsp Rice Vinegar
1 tsp Oyster Sauce
1 Tbls sugar
3 Tbls water with 1/2 tsp corn starch, mixed well

White Pepper as needed or desired

Cut your chicken into cubes and marinate with the wine for about 10 minutes.

Mix the batter in a bowl and put the chicken in the batter and mix well.

Prepare the sauce and have it ready. Have the water and corn starch mixed and ready to be added.

Heat up the oil to fry the chicken once hot. Don't over crowd the pan and place the golden chicken on towels or a tray to drain. Do this until all chicken is fried. If you have a wok, great, if not use a deep pan.

Set the pan aside or if you're going to be using the same pan to stir fry the dish then remove the oil (let it cool some) to another jar / bowl after filtering it to be re-used. Take 3-4 Tbls of the oil and put it in the pan you will stir fry the chicken in and bring it to temperature over high heat.

Add the garlic and stir it for a couple of minutes and the add the bell peppers and continue sauteing them until they become fragrant, just a minute or two. Add the rest of the veggies / fruit. Add the corn starch to the sauce and mix well and then add the sauce to the pan and mix well, you will see the sauce start to thicken almost right away, lower the heat to medium and then add the chicken and mix well so the glaze covers the chicken really well. Continue to mix it well for another 3-4 minutes. You can serve. Enjoy!

This recipe can be adapted to Pork, Shrimp or just and all veggie stir-fry. You can add more chili sauce to make it spicier or you can add more fruit if you like. Hope you enjoy it!


Wednesday, April 3, 2019

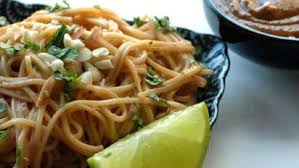
NEW! AN EASIER, FASTER RECIPE FOR "SPICY SZECHUAN NOODLES WITH PEANUT SAUCE"

This is the easiest, fastest, most foolproof way to get Szechuan Noodles with Peanut Sauce! Yahoo!!

You might have noticed that I have several versions of Szechuan Noodles, I love them that much, but over the years I've streamlined the recipe to make it easier and foolproof so it's done in no time flat but the result is just as delicious....

If you keep a wide array of Asian ingredients then this is an every day dish, but even if you have a limited pantry the ingredients are very basic and you will be able to use them for many other Asian Dishes as well.

You will need:

1 cup Peanut Butter (I use creamy but you can use chunky or make your own)
1/4 cup Soy Sauce (I use low salt version because I like it better than the heavier dark type)
1/4 cup Sesame Oil
3 Tbls Rice Vinegar
2 Tbls Garlic, finely chopped
2 Tbls Ginger Root, finely grated
1 1/2 tsp Asian Hot Sauce or Crushed Rep Pepper Flakes (I use Sriracha)
1 Tbls Hoisin Sauce (Plum Sauce)
2 Tbls Lime Juice, fresh (I use Persian Lemons because I love them)
3/4 cup Water
Salt as desired

1/2 cup Scallions, thinly sliced
Salted Peanuts, chopped (if desired)

1 Lb Noodles (you can use pasta, rice noodles, Udon Noodles or your choice)

Put the first group of ingredients in a blender (I use the glass of my immersion blender and it works perfectly) and mix until smooth. Taste it and make sure you like it or go ahead and add more peanut butter or hot sauce or lemon so it's perfect. Set Aside.

Boil water and once boiling put the pasta in the water until al dente. Drain the water and place noodles in a bowl. Add any extras (like the second and third group) or some of these extras:

Grated carrot, grated zucchini, beets, Sweet Red Bell Pepper, Green Bell Pepper, Spinach, Cilantro Leaves, or your favorite vegetables or greens. Good additions are also Cooked Pork Meat Strips, Rotisserie Chicken Strips, Cooked Shrimp, Shredded Crab meat or your desired adds.

You can see how flexible this recipe can be, it can go from Vegan to full blown protein rich, it's up to you to create your favorite version or you can do what I've done in the past and use it like a good old refrigerator cleaning dish and use up leftovers. Still great! You can have these cold, room temp or hot too.

NOTE: If you're not going to use it right away you can put it in a tightly sealed container and keep it in the fridge for up to a week, or if you want to keep for a quick dinner option some night then you can put it into a freezer bag or freezer container and keep it for a longer period.

Hope you try this easy recipe and create your own masterpiece! Enjoy!!

Saturday, March 30, 2019

ASIAN GLAZED CHICKEN,- A quick dinner idea that will please everyone!

ASIAN GLAZED CHICKEN.- A quick and easy preparation you can make even in the middle of the week that will make it seem like a special day!

For this dish I recommend using boneless chicken thighs since they cook up quick and have lots of flavor and whether you de-bone them or buy them like that, it's great. Of course you can use other parts of the chicken, just adjust cooking time accordingly. You can also use drumsticks, wings.


The sauce is very simple but it turns into a sticky sweet glaze that finishes the chicken and gives that !WOW! Factor....

To make these you will need:

1 - 2 lbs chicken thighs, de-bones (we like the skins but you can take them off if you like)
3 Tbls Soy Sauce
2 tsp Five Spice Powder or Asian Spice, ground
1-2 Tbls Chinese Rice Wine, cooking Sake or Rice Vinegar
1-2 tsp Sesame Oil
2-3 heaping Tbls sugar
2 Tbls Oil
2-4 Garlic Cloves, chopped
White Sesame Seeds
Scallions, chopped

Mix the Soy Sauce, Five Spice Powder, Rice Wine, Sesame Oil and sugar in a bowl or zip  lock bag and insure sugar gets dissolved so mix it well. Add the chicken to the sauce and coat well. I leave it 2-3 hours to impregnate the flavors into the meat but you don't have to.

Heat a skillet on low to medium heat and then add the regular oil. Once the oil is heated add the garlic and saute until they begin to get a golden color. Add the chicken to the pan along with all the sauce and cook slowly to keep the chicken tender for up to 8-10 minutes or until the chicken is cooked and the sauce is reduced.

Remove the chicken, plate and garnish with the sesame seeds and scallions. Serve over white rice or arrange like a rice bowl with other vegetables. Serve.

Monday, March 25, 2019

SPICY SZECHUAN PEANUT NOODLES.- A family favorite you need to try!

SPICY SZECHUAN PEANUT NOODLES.- I've been making this for a long time, in many versions like Vegan, Vegetarian, Non-Dairy, No Red Meat, Quick Weekday Meals, etc. and have loved them all!

This is a dish to make quickly and yields maximum flavor. It doesn't matter if you leave out the protein either since it more than makes up in flavor and you won't miss it, plus you can make it spicy or not (I like it hot) and is sooo satisfying! I even used to offer it as a Entree in my Catering Division and was always a BIG hit with everyone! Also, if you make the sauce / dressing in advance you can keep it in a jar in the fridge and this meal can be ready as soon as the pasta is done, nothing could be quicker and easier.

For this amazing recipe you will need:

1 Tbls Szechuan Peppercorns (or you can use other type, your choice)
1/2 lb ground pork or chicken (optional)
3 Tbls Soy Sauce
Salt to taste (might not need it, taste first)
Oil, to fry the pork or chicken only
3 Tbls garlic, chopped
2 Tbls ginger, chopped and peeled
5 Tbls scallions, cut in small pieces
1/3 cup Peanut Butter, Smooth (but you can use the chunky style too, your choice)
2-3 Tbls Sesame Paste (Tahini, if you like)
2 Tbls Chili Oil
1 cup chicken stock, if needed
12 oz Chinese Egg Noodles, fresh or dry (can be spaghetti or similar)
Salted Peanuts, chopped

If you're using the peppercorns then heat a wok or heavy skillet over medium heat, add the peppercorns and ir them until they begin to smoke and then remove them. You will grind them and set them aside.

If you're using meat then put enough oil into the fry pan or work for frying and bring the oil to temperature. While this happens combine the meat with 1 Tbls Soy Sauce and add some salt. Once the oil is hot, add the meat and break it up, cook stirring until it's crispy, then remove from the oil, set aside on a paper towel.

If you cooked the meat then remove all but 2-3 Tbls of the oil from the pan. If not, then add the oil. Start heating the water for the noodles. Bring the pan back to temperature and then add the garlic, ginger and scallions and stir for about 30 seconds, then add the sesame paste or peanut butter (salt if you want), chili oil and chicken stock. Simmer for about 4 -5 minutes then add the meat back into the pan and stir.

Cook the noodles to al dente as always. Drain from the water and place in a large bowl. Pour sauce over the noodles and add the meat (if using) and toss to cover the noodles well. Sprinkle with the grounded up peppercorns and serve. You can sprinkle the chopped peanuts on top as well.

NOTE: I usually make more sauce than this recipe calls for so I can store it in the fridge and have it on hand when the mood strikes for a quick meal....  for me this is a 5 minute thing since all the ingredients are part of my everyday pantry but I can understand if the ingredients are unfamiliar with you, try them and use them in other Chinese or Szechuan Dishes you can find o


n the internet so you not only learn to use them but as you become more familiar with them you'll incorporate them into other dishes you make, it's really great!

You can ad many vegetables as well like Bok Choy, carrots, zucchini, red and green bell pepper, toasted peanuts, bean sprouts, spinach, etc. Other meats could be duck, beef, chicken breast or thigh

Please try the recipe and see how easy and quick it is, hope you like it as much as we do. Enjoy!!

Tuesday, December 4, 2018

TERIYAKI SALMON BOWLS.- Everyone loves these!

TERIYAKI SALMON BOWLS.-  This has to be another one of those dishes that everyone loves and has fond memories of, right? Most people just go ahead and buy a bottle of Teriyaki Sauce at the market when it's a very easy sauce to make and it keeps a long time in the fridge so you can use it on many other things.... like chicken, beef, pork, fish and vegetables or fruit. How about when you're using the grill? Of course! Throw some veggies, some pineapple slices YUM and anything else you can think of.... good eats!

Anyway, very easy to make, keeps a long time and people like it plus goes well with all types of foods, need more reasons?

You'll need:

To make about 1 cup of Teriyaki Sauce: You can double ingredients or more:

1 cup Japanese Soyu Sauce (Soy Sauce), regular dark
1/2 cup dark brown sugar
1 cup Mirin, a Sweet Japanese Rice Wine like Sake but milder (you can add sugar to sake if you want and a little water but it's widely available in the Oriental Foods aisle at the market
1/2 cup Sake, your choice

Bring all ingredients together in a small saucepan. Bring it to a boil over medium-high heat, reduce the heat to a simmer and cook for about 20 minutes or until it thickens enough to coat a spoon. Remove from the heat and either use at once or cool and place in an airtight container in the fridge.

NOTE: I've also added other flavorings to this as time has gone by like, orange juice, finely chopped ginger, different crushed peppercorns, sirasha, etc. You can test it out and see what you like.

Anyway to make the TERIYAKI SALMON BOWL once you have the Teriyaki Sauce, you'll get:

White Rice ready, any kind you like (you can also use Brown Rice)
Salmon Fillets, dry with paper towels on both sides
salt and pepper
some oil for cooking
an avocado, sliced
some sliced cucumber
black and white toasted sesame seeds
green onions or scallions cut in small pieces.

In a fry pan with a little oil, cook the salmon fillets (the size of your bowl or strips) only enough to get a golden color on the outside but leave some pink on the inside since you don't want to overcook the fish, ok? NEVER OVERCOOK FISH!!!!

Turn the fillets to briefly cook the underside. Once done, remove and set aside.

Put rice in the bowls, top with sliced avocado, cucumber and scallions. Top this with the Salmon Fillet and cover with s large soup spoon of the Teriyaki Glaze, spreading it evenly with the back of the spoon. Sprinkle with the Sesame Seeds. Serve immediately. Enjoy!

You get the idea, add more veggies, noodles, different rice (like black rice YUM), proteins, legumes, fruit, whatever you like better or have on hand. Believe me, it will be great!

Also, once you have the sauce in the fridge, this can become an easy and quick weeknight dinner that will really satisfy and delight you!


Tuesday, August 14, 2018

PAN SEARED TUNA STEAKS WITH MANGO CHUTNEY.-

PAN SEARED AHI TUNA STEAKS WITH MANGO CHUTNEY.- Looking around town for a variety of fish and seafood I found some Ahi Tuna Steaks at my latest Costco outing and decided to try it and see if this could be an option for us. Reasonable price, flash frozen, individually wrapped so you can use one or more which I like and found they looked alright and this is the resulting dish.

I do a variety of flavors of Chutney since it's fruit based and whatever you have on hand will do but ran into this suggestion and decided it sounded really great and it was. I can also see canning it for later use too if I ever get industrious. There is some work involved but definitely worth it, believe me.

The Ahi Tuna defrosted really well and the fish was soft and supple. Will try making Poke next to see if they can be used raw as well which is what we like the best, but today it's pan seared so let's go.

For this preparation you will need:

2 - 4 Tbl Olive Oil
Ahi Tuna Steaks, I used three, one for each of us
2 Mangos, ripe and fillets cut into 1/2 inch squares
2 Onions, medium sized, chopped into 1/2 squares
1 Tbl Ginger, fresh, grated or finely minced
1 Tbl Garlic, fresh, pressed or finely minced
1/2  cup Orange Juice, fresh
1 Tbl Brown Sugar or Cane Sugar, your choice
1 Tsp Salt
1/2 - 1 Tsp Black Pepper, fresh ground
1 Jalapeño / Serrano Pepper, de-seeded, chopped very fine or crushed red pepper flakes, your choice
2 Tsp Mint Leaves, cut in chiffonade
1 Tsp Cilantro Leaves, chopped, as topping (optional)
-or-
1 Tsp Thyme Leaves, finely chopped
1/2 Tsp Dill Leaves

First you will prepare the Chutney since that takes more time while the steaks cook quickly.

Place some oil in a large saute pan over medium heat and once the pan is hot add the onions and cook stirring often, for about 8-10 minutes so they become a little golden, at this time add the ginger and keep stirring for about 2-3 minutes. Now add the garlic and mango, lower the heat to low for about 8-10 minutes.

Now add the orange juice, sugar and the pepper you've chosen. Salt and pepper to taste.  Cook for about 4-5 minutes so the orange juice is reduced some. You want it moist but not liquid. Keep stirring now and then. Remove from the heat and add the herbs.

We can cook the fish at this point so while you get a saute pan very hot over med-high heat, dry the steaks really well with paper towels then salt and pepper them liberally on both sides. When the pan is hot, add some oil to the pan and lay the steaks on the hot pan.

To sear the steaks and leave a pink center which is commonly how Ahi Tuna is served, cook for about 2 minutes per side or until the outside is a nice browned color, not dark brown unless you want a grey inside the fish. The more you cook, the less moist the fish will be.

To serve: Place a mound of Chutney on the plate and lay a steak on the side of the Chutney.

I made Bacon-Almond Green Beans as a side dish with this and it was quite lovely. I hope you will try and enjoy!

Note: I made more of the Chutney, went ahead and placed half in a jar in the refrigerator and we've enjoyed it with chicken, as a complement to sandwiches and even used it on toast. We are keeping this dish, it was really good!


Saturday, July 28, 2018

Seared Tuna Steaks with Soy Lime Noodles.-

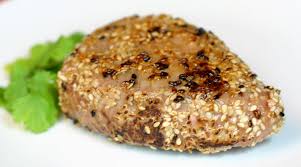
Seared Tuna Steaks with Soy Lime Noodles.- I had found some pretty nice Ahi Tuna Steaks at one of my regular markets and decided to make a nice dinner for us and this is what I decided on, let me tell you the results are worth repeating. Once you have your ingredients ready, this meal comes together very quickly:

First find the Ahi Tuna Steaks, one per person since you will be coating it with sesame seeds and then it will be lightly seared. We had Tuna Poke the other day so I needed something different and this sounded just right (and it was YUM). For this recipe you will need:

4-5 oz individual tuna steaks
Salt and fresh ground pepper
1 Tbl of Sesame Seeds per steak, can be any color your choice
1 Tbl olive oil
Asparagus Spears, cleaned (optional but are nice sauted with the fish)
1/4 cup Soy Sauce
1/4 cup water (I used the pasta water after removing the noodles)
2 Tbl fresh Lemon Juice
Egg Noodles or Pasta, preferably spaghetti but your choice
2-4 Green Onions, cleaned and sliced thin
2-3 Tbl Cilantro Leaves, finely chopped

Pea & Bacon Salad (see post on this blog for recipe, prepare and keep cold in fridge)

Instructions.-
Pat dry the tuna steaks on both sides, season on both sides with salt and pepper. Put the sesame seeds on a plate and cover the steaks well on both sides with them, you can press down lightly. Heat the oil in a nonstick pan over medium-high heat until hot. Sear the steaks for:
Sear for 30 seconds on each side for RARE
Sear for 1 minute per side for MEDIUM
Sear for 90 seconds to 2 minutes for WELL DONE
Once seared remove the steaks to a plate. Now add the asparagus and any sesame seeds that were left over on the plate that didn't get seared with the steaks to the pan and cook over medium heat for about 30 seconds. Remove from the heat. Place water in a large pot to boil on high heat, add some salt to the water. Once boiling, add the pasta and keep an eye on it.

In a large bowl add the soy sauce, water (or some pasta water) and lime juice. Add the noodles once they are "al dente" along with the green onions and toasted sesame seeds, toss to combine well. Now you can plate the noodles, you can cut the steaks in half or in strips for service or just leave whole. Put the tuna on top of the noodles. Serve the Pea & Bacon Salad on the side and serve. Enjoy!!


Thursday, May 31, 2018

PINEAPPLE FRIED RICE.- This time made with Brown Rice....

PINEAPPLE FRIED RICE.- 

Fried rice has always been a favorite for everyone, one of the reasons we always kept that extra box of the dry white rice Chinese Restaurants always used to send along with every order of delivery Chinese Food. In order to make Fried Rice you need rice that's been kept in the refrigerator overnight so it loses some of the moisture and allows it to get fried, but if you think about it it's a great way to finish up old rice or leftover rice.

This time I made the fried rice using Brown Rice, not just for a change in flavor but for a more nutritious side dish too. Allow yourself a little extra time since Brown Rice being a whole grain takes a little longer to cook. I found a great recipe on Saveur (a great resource, check it out) for all things www.saveur.com that will give you a perfect pot of Brown Rice every time with very little effort and pretty foolproof too.


INGREDIENTS.-   For PERFECT BROWN RICE EVERY TIME...
1 Cup of Brown Rice, can be short or long, doesn't matter
1 cup rice = 2 cups cooked rice
1 1/2 cup rice = 3 cups cooked rice
2 cups rice = 4 cups cooked rice
*If making more than 1 cup dry rice, use a bit more water
Salt to taste

Rinse the rice first in a strainer really well a couple of times. In a large pot bring 8-10 cups of water to a boil, be sure the pot has a tight fitting lid. Put on the stove over high heat. Once the water is boiling add the rice and continue to boil, uncovered for 30 minutes. Pour the rice into a strainer over the sink and let it drain about 10 seconds.

Return the rice to the pot, insure the heat is off. Cover the pot and leave it resting to allow the rice to steam for 10 minutes. After that time, uncover the rice, fluff with a fork and season with salt to taste.

INGREDIENTS.-  For PINEAPPLE RICE....
3-5 Tbl Soy Sauce
1 Tbl Sesame Oil
1/2 tsp Ginger Powder
1/4 tsp White Pepper
2-3 Tbl oil, your choice
2-4 cloves garlic, minced
1 small onion, chopped
2 carrots, peeled and chopped into small squares
1/2 cupcorn, can be fresh, canned or frozen
1/2 cup peas, can be fresh, canned or frozen
3 cups cooked Brown Rice
2 cups pineapple, cut in small pieces, can be fresh, canned or frozen
1/2 cup ham, bacon or your choice of meat, chopped in small pieces
2-3 green onions, sliced

In a small bowl whisk together the soy sauce, ginger, sesame oil and white pepper. Hold

Heat the oil in a large skillet or wok on the stove over medium high heat. Add the onion to the skillet and cook, then add the garlic, stir often and do not allow to burn. Once the onions are shiny after about 3-4 minutes, add the carrots and cook for about 10 minutes until they start to get tender (this is only if you're using fresh carrots since they are a hard vegetable), however, if you're using canned or frozen add the carrots, corn and peas together and cook, stirring about 3-4 minutes.

Add the rice while stirring it in, then add the meat you've chosen along with the soy sauce mixture. Finally add the green onions and mix. Allow everything to come together and get heated through. About 2-4 minutes. Serve.

NOTE: You can change the vegetables to whatever you'd like or have on hand, use leftovers too. Same goes for the meat, you can use almost anything or leave it vegetarian, your choice.

Don't forget that you can use this base recipe for leftover white rice too. Once you start experimenting with this recipe you'll see how flexible, easy and fast it is and you'll create your own family's version. I hope you will try it. Enjoy!


Monday, May 21, 2018

PART II.- FROM PEKING DUCK TO DUCK & NOODLE SOUP

DUCK NOODLE SOUP.-

If you saw my post about PEKING DUCK you read were I recommended you save the duck carcass for a later project, this is the project I usually use the bones and any leftover meat from the duck.
This is another easy meal to make and if you consider that it's the same duck you had before it makes any expense for the ingredients even more economical. This makes enough for 3-4 servings easily.

Ingredients:

Duck Carcass, leftovers from duck dinner, meat / bones
Duck fond, leftover from separating the duck fat (another use) and dark syrupy base
Spaghetti or any other noodle of your choice
2 small carrots, peeled and cut into small cubes
2 small scallions, dark green removed, the rest cut in thin 2 inch strips
Soy sauce (optional)
Fish Sauce (optional)
Sugar (optional)

Place all duck parts in a large heavy pot, add good quantity of water. Bring to a boil, lower heat. Add duck fond and simmer for at least 1 1/2 hours. At this time check the color and flavor of stock, at first it will be somewhat clear, continue to simmer. You might have to add a cup of water to replace the water lost to evaporation. Simmer for 30 more minutes or  until the stock is a deep brown color. Taste the stock and add soy sauce, fish sauce, sugar, salt or anything you like. Simmer 15 minutes more to allow stock to become a bit thicker.
At this time you will add the carrots and scallions. Reserve 2-3 tbl of scallions for topping on the soup when serving. Allow the stock to simmer an additional 15 minutes to soften carrots.
Adjust seasonings again and once this is done the soup is done. If not using right away, you can cool for storing but if you will use at once then you can bring up the heat to boiling and add the pasta. Once the pasta is cooked you're ready to serve. Top with some scallion strips. Enjoy!

Thursday, May 17, 2018

PEKING DUCK - MAKING PEKING DUCK AT HOME

MAKING PEKING DUCK AT HOME.-

If you're like me you've had Peking Duck at your favorite Chinese Restaurant and was amazed by the show, the flavor and the duck. Did you ever wonder if you could try making it at home? I did and as a result I've made it several times, although this last adventure was under totally different weather conditions.... You might think: "what does the weather have to do with it?" or "this is not baking, so why the weather comment?".... And you'd be right, in baking, since it's a science, the weather affects the formulas and so must be taken into consideration, but cooking is an art and as such different rules apply.

One of my first attempts to make this duck was in Tijuana, Baja California- I had a much larger installation, a separate room to do my machinations in (ok, the laundry room area where I could hang the duck to dry as long as I wanted to and it was a closed place so no attacks from insects or kitty), over the years my kitchen has changed from really fancy to modest to darn near small and incredible anything gets done and now to small and the weather question. I'm also living in an Airbnb which leaves me handicapped as to the equipment I have to work with (which is why it's a valuable project to undertake, I have none of my professional cooking tools) plus I'm living in Merida, Yucatan which is humidity PLUS area of the country, in short the tropics so getting the duck to dry has been a challenge to say the least! But onward we go....

Also, there are several ways to go about this too, the classic method which requires 3-4 days of "painting / dipping" the duck and then hanging up to not only dry but mature, over and over, ergo the special place to work, etc. but this time while perusing the Serious Eats site that I find useful tips on, check them out, you'll love them www.seriouseats.com with recipes, equipment ratings, how-to's and shortcuts.
So anyway, I found the regular long recipe but then he thought the same thing as I did (great minds think alike, lol) and experimented with a shortcut version to Peking Duck which is the one I am trying today- shorter time, quick and dirty.... so we'll see how this one turns out under humid weather.

Right off the bat I realized the duck could not be hung to dry, I've got a laundry room I could use but there's some Chiles de Arbol drying there for a week and no drying at all due to the humidity so it wouldn't work for the duck. I had to leave it in the fridge for 3 days to even dry a little... so pay attention to the humidity in your area. Go by the way the skin on the duck is drying, it has to get dry like leather.

ONE MORE THING:  Under no circumstances THROW AWAY THE CARCASS / BONES of the duck. Try to leave some meat on the bones if you can since this will tenderize more and fall off the bone giving the soup the benefit of the meat or simply save the duck back for the soup, it's definitely worth it. I will show you how to use it, as DUCK NOODLE SOUP, so cover it up and refrigerate it or freeze.

 Some observations from this latest attempt: Next time I will leave the duck for a much longer period in the fridge, needs more drying to get the skin totally crispy and while mine was super yummy it was more a roast duck with the flavor of Peking Duck which is totally not a bad thing just not the result I was aiming for, so again, pay attention to the humidity in your area and adjust accordingly. Everything else was wonderful. Costco has always carried the Canadian ducks in their stores, even here I'm happy to report and for the $294 MX (about $15US) they cost for the whole duck and two meals it's a bargain of quality meat.

Here's the recipe:

1 Duck, about 4 lbs. (Got mine at the local Costco, same brand as in the USA)
1/2 cup honey or maltose
2 tsp soy sauce
2 Tbl Kosher salt
2 tsp baking powder
1 16oz can of beer, soda or ?

Pancakes:
2 cups all purpose flour
2/3 cup boiling water
1/4 cup sesame oil

Plum Sauce:
1/4 - 1/2 cup sugar
1/4 cup white vinegar
4 regular plums, cut in half and seed taken out
1 Tbl fresh ginger, grated
1 Tbl Chinese Chili Garlic Sauce

Serving:
1-2 bunches of scallions or green onions, cut off the dark green parts
1 cucumber, cut in half, take out the seeds

To Serve:

  • 6 scallions, white and light green parts only, finely sliced lengthwise
  • 1 small cucumber, seeded and cut into 4-inch long matchsticks


To begin:

Rinse the duck off. Dry it completely with paper towels. Put in baking pan on a rack and little by little, either using your fingers (like I did) or the handle of a wooden spoon, slip between the skin and the meat and begin separating the skin from the meat. Be careful not to make holes in the skin, start from the bottom cavity opening of the breast and inch your way up. You can also start on the top, go halfway and then meet your way from the bottom, whichever is easier for you. Try to slip your hand toward the thigh / leg area too. Take your time, sometimes if the duck is fresh or has not been dead a long time, there is a film between them and it can be pretty tight, just keep at it.

Combine the honey and soy sauce with 1 Tbl of water and warm up in a microwave for about 20 seconds and then mix well. Spoon, rub or paint all the surface of the duck, all the skin. In a small bowl combine the salt and baking powder and mix well. Sprinkle over all the surface of the duck.This will help with the drying and crisping of the skin.

Put the duck in the fridge, don't cover, at least 12 hours or as long as needed until the skin is like leather and dry. This is what you want. Once the duck is dry, take out the second rack out of your oven and place the one rack left at the lowest position to leave you room for the duck. 

Preheat the oven to 350F. Put 4 quarts of water to boil on the stove, make sure it's a rolling boil. Put the duck in the sink over a rack so it can drain and once the water is really boiling, pour half of the water over the duck, really well and all over, then turn it over and do the same on the other side. You'll see the skin contract / shrink as the hot water hits it. This is what you want. Let the duck dry for 5 minutes.

Now get a baking dish or something with an edge on it to catch juices and or fat from the duck as it cooks, get your can of beer / soda or whatever and drink it up since you don't need the contents because it doesn't really add any flavor and now fill up the can all the way with water. Place the can in the middle of your baking pan and gingerly sit the duck down over the can so it sits squarely in your pan. Move the legs and / or break the tail to insure it will remain standing up since this will allow cooking all over. Now place it carefully in the oven and roast it for 30 minutes, rotate and cook another 30 minutes more, so 1 hour total. Then reduce the heat to 250F and roast for another 30 minutes or until the fat stops dripping from the cavity. If it's still dripping fat, leave it for an additional 30 minutes more. The duck should have a wonderful dark brown color. If you think it's getting too dark, tent some foil over the top and around the wing tips to prevent it from burning.

At this point, carefully remove the duck from the can and put it on a cutting board. Allow it to rest without cutting it for at least 10 minutes before you attempt to cut it up.

Take the scallions, cut in about 4 inch pieces and slice then very fine. Cut the cucumber in long, thin slices too. These will be inside the pancakes so use an appropriate size for a duck taco, ok?

MAKING THE PANCAKES.- Combine flour and boiling water and stir with a wooden spoon until you get them to come together. Put on a counter top with flour on it and knead until the dough is smooth and elastic, for about 5 minutes. Cut the dough into about 24 pieces and cover with a damp towel.
Flour the surface and roll out the dough one piece at a time into a small circle, keep going and brush the first circle with the sesame oil before you put the second one on top and so forth. Or make larger balls to make larger pancakes, your choice. But the thinner the pancake, the better. 

Get a heavy cast iron pan or griddle over medium-high heat and get it hot. Cook pancakes for about 1 minute and they have light brown spots. Flip and cook about 30 seconds more. Place in a clean towel and be sure you can peel them apart. Cover well with a towel to keep warm.

You can also buy flour tortillas at the store if you'd prefer or if you think this would be too much, it's cool, no judgments at all, I know I can go a little over at times.

MAKE THE PLUM SAUCE.-  You can use Hoisin sauce too which you can get at most markets now. But if you've got fresh plums, put the sugar with 1 Tbl water in a heave pot over high heat and get the sugar to become a nice amber color, be careful and don't burn, it will take 3-4 minutes. Add all the vinegar right away which will make the sugar bubble, keep cooking for about 1 minute more and add plums, soy sauce, ginger, chili garlic sauce and reduce the heat to med-low and keep cooking while you smash the plums and they break down, about 10 minutes. Blend the sauce well in blender or with an immersion blender until smooth. Place in a bowl to serve.

Now you can carve the duck, careful of the skin. Spread some plum sauce over a pancake, top with cucumber and scallion and then duck meat with some skin on top. Enjoy!

I hope you won't be put off by the long process, it's really not hard just takes a while but I definitely recommend making this for yourself if you love duck. I don't have a Chinatown nearby, like in Vegas where I would just go to the International Market and pick up a duck, no such luck here :-( .....