Showing posts with label Fish. Show all posts

Friday, March 21, 2025

PAD KRA PAO.- Thai Basil Stir Fry... A must for your recipe collection!!


       PAD KRA PAO.- The most iconic dish and favorite street food in Thailand!... This Thai Basil Stir Fry can be made with protein, vegetarian or vegan. It can be a main dish or a side one, anyway you like it, spicy or not, juicy or not, your family's special ingredients and done in a flash!...

Don't be taken aback by the ingredients, these are the basic ones needed for a Thai kitchen, so if you like Thai food you'll be using them over and over... 

A very easy dish to prepare, just follow the steps and you'll see the changes you can make, the ingredients you can add or remove and produce a wonderful meal for your family.

To prepare this, you'll need:

10 oz protein, your choice, raw or cooked - in small spoon size bites
2 tsp Fish Sauce
1 Tbls Oyster Sauce
1 Tbls Soy Sauce
2 Tbls water
2 tsp sugar, or more according to your taste
1-5 Thai Chilies or the chilies you like or have
5-8 Garlic cloves
1 Tbls Ginger - grated or chopped fine
1/4 cup mild red chilies, red bell pepper, capsicum, chopped
1/2 medium onion, small dice
1 1/2 cup Basil Leaves
Vegetable oil as needed
Eggs - 1 per serving
Jasmine Rice or whichever you have - to serve along with

1-    Make the sauce by combining oyster sauce, soy sauce, fish sauce, black or dark soy sauce, sugar, ginger and water. Stir until the sugar is completely dissolved.
2-    Pound the Thai chilies into a fine paste in a mortar and pestle, then add the garlic and the mild chilies, ginger and pound into a rough paste, just until there are no more big chunks.
3-    If using raw protein, heat a wok or a skillet until very hot on high heat, add just enough oil to coat the bottom and add the protein, spreading the pieces out into one layer. Let them sear until browned on the underside, then give it a toss and stir until it’s done. This should only take a few minutes in total. Remove from the pan. Note: You can skip searing the protein and just add it to the wok raw, but the browning does add a nice flavor.
4-     In a wok on medium-high heat, add the chili garlic mixture and stir until the garlic starts to turn golden, about 2 minutes. Add the onions and cook it for 30 seconds to a minute to soften slightly. 
5-     Turn the heat up to high and add the protein and the sauce, and toss everything together just for 30 seconds or so, until the meat is well coated and heated through. If you didn’t pre-cook the protein, take your time and keep tossing until it’s cooked through.
6-    Turn off the heat, add the basil, and toss just to wilt.
7-    Make the fried eggs if you wish, and serve the stir fry with jasmine rice and topped with a fried egg

I hope you will try this dish and see why we love it! The flavors are classic and unmatched! Also an economical dish to prepare and serve.


Monday, August 7, 2023

Pan Bagnat, a unique sandwich from Provence...


 Pan Bagnat.-  Remember this name, you'll want to repeat this one!

Pan Bagnat is a local delicacy in Nice, France, and if you love Salad Nicoise then you will love this sandwich... Full of fresh flavors and Mediterranean favorites, it's a wonderful addition to your sandwich collection...

In order to make this, you will need:

1 - 2 Baguette or your choice of sturdy bread

The dressing: (this can be made ahead, you'll want to put it on many things!)

1/2  Red onion, cut in half then sliced very thin

1 clove of garlic, finely minced or grated

3 Tblp Red Wine Vinegar

Mix everything well and allow this to rest for at least 20 - 30 minutes to soften.

1 Large tomato, remove core and slice thin


In a bowl combine the dressing ingredients and allow to rest. Place the slices tomatoes on a plate and salt / pepper / lemon drops on them to season and allow to rest until needed.

Now take your baguette or chosen bread and slice lengthwise so you have a top and bottom. Remove some of the "crumb" to the bottom part of the baguette so you create a kind of channel where you'll place your finished dressing in... Once done, brush both sides of the bread with olive oil and cover well. NOTE: You can toast the bread in the oven for about 5 minutes if you like.

Place in a food processor:

1/2 cup Parsley leaves

2 Tbls Marjoram Leaves


3 Tbls Capers

3 Anchovy Fillets, rinsed and dried off

3/4 cup Nicoise Olives, pitter

Pulse until the mixture comes together to form a type of "tapenade" or spread to use in the sandwich. Once well mixed, but still chunky, you'll ad this mixture to the bowl with the start of the dressing (the onions with vinegar) and mix well, now add

1/4 cup Olive oil 

2 tbls Dijon Mustard

1/4 tsp Black Pepper, fresh ground

Mix it all well. Now you have your finished dressing.

To put together:

2 6.5 oz cans of Tuna (get the very best you can)

3 Hard Boiled eggs, peeled and sliced thin

Pile in your finished dressing on the bottom bread, be generous, then you follow with your tuna (you can break it up but still leave good chunks) add some lemon on the tuna if desired and then top with a couple more tablespoons of Olive Oil.

Now shingle your seasoned tomatoes over the tuna so you cover the entire sandwich. This is followed by slices of the hard boiled egg, once again shingled to cover the sandwich. Nowtop this with a little more finished dressing!!

Close the sandwich and then slice in half for easier preparation.

Each half of sandwich will be wrapped in cling film, tightly and place on a tray, now place another tray over the sandwiches so you can press them (like a Mufaleta), so place a heavy object on top of the second tray so they will be pressed.

Leave the weight on them at least 1 hour before serving. Enjoy!!


Monday, April 17, 2023

Vietnamese Baked Chicken - Such a wonderfully flavorfull Chicken!!


 Vietnamese Baked Chicken.-  You'll appreciate the results of this recipe, the flavor is truly wonderful. You'll also appreciate the easy prep to get it done... Plus it's flexible too and I'm planning on using the marinade on Beef to make Satays, Fish, Seafood, Pork YAY!!

Let me tell you what you will need to prepare it:

        2 pounds (900g) bone-in, skin-on chicken thighs

    • 1/4 cup (60ml) soy sauce

    • 1/4 cup (60ml) Asian fish sauce

    • 1/4 cup (55g) palm or dark brown sugar - I also use white

    • 2 tablespoons (30ml) grapeseed or other neutral oil

    • 2 packed tablespoons (7g) fresh cilantro leaves and tender stems, finely chopped

    • 1 1/2 tablespoons (20ml) fresh juice from 1 lime

    • 1 teaspoon (5g) finely grated zest from 1 lime

    • 1 tablespoon (10g) minced peeled fresh ginger

    • 2 teaspoons (10ml) hot chile paste (sambal oelek)

    • 3 medium cloves garlic, minced or grated (about 2 teaspoons)

    • Sliced limes and cilantro leaves, for garnish

Directions

    1. Place thighs in a large zipper-lock bag. In a medium bowl, whisk together soy sauce, fish sauce, sugar, oil, cilantro, lime juice and zest, ginger, chili-garlic paste, and garlic. Pour marinade into bag with chicken, seal bag, and toss to coat well. Let chicken marinate for at least 30 minutes and up to 4 hours. I recommend 4 hours.

2. Preheat oven to 425°F (220°C) and set oven rack to middle position. Line a rimmed baking sheet with foil and place a wire rack on top. Remove chicken from bag, allowing marinade to drip off, and set on wire rack skin-side up, making sure to leave space between thighs.  

Bake until thighs register 155 to 160°F (68 to 71°C) on an instant-read thermometer, about 35 minutes. (Be sure to measure temperature in the center of the thickest part of the thighs, but not directly against the bone.) If chicken skin is not brown and crisp enough by the time the thighs are cooked through, set broiler to high and broil until browned and crisp, about 1 minute, being careful not to burn the skin. Transfer chicken to a platter and let rest for 5 minutes. Garnish with lime slices and cilantro, then serve.

NOTE:  I have used the leftover marinade as a finishing glaze, either just reduced or with an addition of honey (for the glaze shine) plus a little sweeter is yummy. But you can add more chili sauce, lemon to pump up the flavor.

You can also make this in an Air Fryer instead of a conventional oven. I use the same time to cook but keep an eye on it. Once at temperature (see above) I insure the charred bits are the way I like, if not I put it back and Airfry it for another 5-6 minutes until it gets the color desired.


Wednesday, March 15, 2023

Cuaresma: Deliciosa, ligera, flexible y muy sabrosa!...

En Mexico la Cuaresma es realmente observada como la recuerdo de hace muchos años. De chica, en mi casa no se celebraba pero cuando fui a vivir a Puerto Vallarta, a Merida y hasta en la CDMX, vi las costumbres clasicas de Cuaresma fielmente practicadas, me dio gusto e incorpore muchos de estos platillos dentro de los menus para mi familia y hasta en nuestros changarros aparecian durante la Cuaresma.

La Comida Mexicana se presta para esta epoca del año al ser tan variada y con tanto sabor que se antoja durante el resto del año o si necesitas ahorrar en tu presupuesto. 

Aqui hay algunas sugerencias:

1.-    Tortitas de Atun con Papa:    


3 papas medianas cocidas y peladas 1 huevo, batido con tenedor 1 cdta sal 1/4 cdta oregano 1/4 cebolla, finamente picada 1 lata de atún (lata grande) 1 taza pan molido (empanizador o lo que tengas) 1/2 taza cilantro Salsa Estilo Chileña: 1/4 aceite oliva 1 cda vinagre manzana 1 limón 1/2 manojo de cilantro 2 a 4 chiles serranos (mas o menos, cualquier chile sirve) 1/4 cebolla 2 dientes de ajo

1 -2 Aguacates

Preparacion: Se pueden usar guantes si se desea

1-    Las papas ya enfriadas se ponen e un tazon oara machacarlas y queden sin grumos. Se agrega el huevo batido, el atun, la sal, la cebolla y el cilantro. Se amaza muy bien y cuando se vea integrado todo se le agrega la mitad del pan molido, se amaza y despues el resto del pan, finalmente otra amazada para que quede parejo y se deja reposar.

2-    Con un poco de aceite en las manos se empiezan a formar las tortitas. Que no sean muy gruesas para que se cocinen facilmente.

3-    En un sarten con unas cucharadas de aceite sobre fuego medio se deja calentar, cuando este listo se empiezan a freir las tortitas, dandoles vuelta para asegurar el color deseado, hasta que se doren. Se ponen en un plato con papel absorbente hasta terminar.

SALSAS QUE ACOMPAñAN:

1-    En el sarten que quedo de las tortitas, que tenga un poco de aceite se pone el aceite, chiles, ajos y cebollas sobre fuego mediano, se sancochan hasta que se doren ligeramente y que no se quemen los ajos.

2,-    Ahora en la licuadora se pondran los chiles y demas, aceite, vinagre, el judo del limon y cilantro.con cualquier aceite que haya sobrado en el sarten y un aguacate. Se licua suavemente para que todo se integre, se le puede ayudar con unas gotitas de agua o mas limon pero debe de ser una salsa espesa.

3.-    Se prueba la salsa para decidir si añadir mas aguacate (no es guacamole sino salsa), limon, aceite de oliva, sal y pimienta.

TORTITAS DE BROCOLI:

3 tazas de brocoli cocido (es mejor a vapor) 1 taza queso mozarella (se puede omitir) 3 huevos 2 cdas cilantro 1/4 cebolla blanca 1 cdta ajo en polvo 1 cdta sal 1 cdta oregano seco 1 taza empanizador

Preparacion: Si no se quiere usar queso, de nuevo se puede usar papa, arroz o un bechamel espeso tipo croqueta. Se puede sustituir por cualquier otro queso que se derrita. Para sustituir el empanizador o pan molido se pueden usar galletas molidas (fijate si contienen sal)

1.-    El brocoli debe quedar con tallos suaves pues se machaca con un tenedor una vez cocido en pequeños pedacitos.

2.-    Cuando el brocoli este listo se agrega el resto de los ingredientes y se procede amazar todo hasta que queden muy bien integrados.

3.-    Se procede a formar las tortitas y se ponen en un plato espolvoreado con un poco de pan molido y se le pone un poco de mas pan molido por arriva tambien, esto ayudara al freir.

4.-    Una vez doradas las tortitas se ponen sobre papel absorbente.

SALSA PARA ACOMPAñAR:

ADEREZO DE SALSA: Se puede usar picante o no.

1/2 - 1 taza Mayonesa (puede ser 1/2 yogurt y 1/2 mayonesa)

1/4 taza de Salsa Mexicana o cualquiera que tengas

1 cucharadita de azucar

Sal y pimienta al gusto

Se mezcla todo muy bien, probando hasta que quede de tu gusto.

ADEREZO DE YOGURT:

1 taza de yogurt PLAIN o Griego

jugo de 1/2 limon

1 diente de ajo picado finamente

6 - 8 hojitas de hiervabuena, finamente picadas

2 - 3 cucharadas soperas de cilantro finamente picado

NOTA: Este aderezo se le pueden agregar pepinos rebanados finamente y/o tomate sin semillas, cortado en cuadritos. A probar para asegurar el nivel de sal.

Se mezcla todo muy bien para que quede cremoso.


Wednesday, August 18, 2021

Thai Spicy Basil Fried Rice.- One of my all time favorite dishes that brings me good memories and super flavor!!!

 Thai Spicy Basil Fried Rice.- This dish not only brings me wonderful memories but the flavor is so amazing that it's become one of my family's favorite too. Very easy to make, fast to prepare and brings a lot of flavor. 

Another thing I love about this dish is that it can be made with any type of protein you like or you can make it without animal protein, you can add veggies or change them around, plus you can take advantage of delivery white rice, that dry white rice that most people toss but for this is just perfect. I usually make plain white rice, leave it uncovered in the kitchen so it gets cold so you can use it later in the day, if it's dry it's fine. You will add flavors and sauce later and you will be amazed.

Here is what you'll need to prepare it:        


3 Tbl Oyster Sauce

2 Tbl Fish Sauce

2-3 Tbl sugar (more or less according to your taste)

1/4 - 1/2 cups oil (can be vegetable, peanut or sesame)

4 cups dry white rice

6 Cloves Garlic, crushed or press

2-3 Serrano Peppers, seeded and cut into fine strips (depends on heat level)

* Proteins: Cup of shredded chicken, pork, steak, shrimp, fish, tofu, etc. It's best if you cook these beforehand or use leftovers. You can also do without.

1 Red Bell Pepper, seeded and cut into thin slices (or green or yellow, your choice)

1 small Onion, thinly sliced (I like Green Onions, white and green parts separate)

1-2 cups Basil Leaves, cut in Chiffonnade, thin strips

1/2 Cucumber, peeled and sliced in small batons

1/4 cup Cilantro Sprigs

1-    Whisk together the Oyster Sauce, Fish Sauce and Sugar and reserve

2-    Over medium-high heat, heat the oil in a wok / cast iron / large pan until the oil begins to smoke.

3-    Add the garlic, Serrano Peppers, stirring quickly. Then add the protein you've chosen, onion, red bell pepper and the Oyster Sauce mixture and mix well. 

4-    Turn the heat to high and add the rice. Stir quickly so the rice breaks up and gets covered by the sauce and everything is well blended. Break up any rice that has stuck together with the back of a spoon. Keep tossing the rice and ingredients to heat really well and combine. 

5-    Remove from the heat and add the Basil Leaves. Garnish with the cucumber and cilantro for serving.

Thursday, July 8, 2021

English Style Two Crust Chicken Pot Pie.- If you have to go... go all the way!!!

 English Style Two Crust Chicken Pot Pie.- This takes a while but it's totally worth it!!!


    I started this recipe by basing it on the classic English Style of Pot Pie since I had lots of Leeks and wanted to use them because a meat pie truly deserves leeks! Anyway, I had all the ingredients and so began my foray into deliciousness. Let's start:

INGREDIENTS:

FOR THE STOCK: Yes, fresh stock adds so much flavor!!

1 Whole Chicken, cut in parts, include the carcass 

1 Celery stalk, snap in two, include celery leaves if you have them

1 Large Carrot, cut in half

1 Onion, cut in half

3-5 Bay Leaves, depending on their size

1 tsp Whole Peppercorns

1 Small stalk of Parsley Leaves

FOR THE FILLING:

50 g AP Flour (All Purpose)

50 g Butter

2-4 Leeks, depending on size, remove tough parts, slice fine

1 Carrot, peeled and cut into small cubes

1 cup Peas, cooked or frozen

2-5 Garlic Cloves, peeled, smashed and cut into small pieces

2-4 Tblsp Olive Oil or enough to lightly cover bottom of pan

250 ml White Wine, your choice

250 ml Heavy Cream

1 Tblsp Tarragon, chopped

1-2 Tblsp White Wine Vinegar or Lemon Juice

1-2 tsp of Chile de Arbol powder

  • 1 egg, beaten
  • Rosemary taken off the stalk and chopped


Salt and Pepper to taste

  • FOR THE PASTRY:
  • You can buy Puff Pastry or Pie Crust at the store, make your favorite type of pie crust, but make enough for 2 crusts since I make a double crusted pie (don't like the single crust ones for serving or presentation). You can also make it a single crust pie if you like....
INSTRUCTIONS.- And away we go!!......

1-   TO MAKE THE CHICKEN STOCK.-  In a heavy pot place the celery, carrot, onion. Add the whole chicken and carcass, add the Bay Leaf, Parsley and Peppercorns and fill up the pot with cold water. Make sure it's all covered and put the lid on. Bring to a boil, then lower the heat to a simmer and allow to cook at least 30-45 minutes (depending on the size of the chicken breasts). Check on the water level and add more water as needed. After 30 minutes check the breasts to insure they are cooked through, otherwise cook another 15 minutes. Once they're cooked, remove the chicken, leave the carcass and veggies and continue to simmer for a full 90 minutes. Drain the stock through a colander or sieve, you can discard the carcass and veggies now, place the chicken in a bowl to cool and remove the skins. Check the stock and add salt and pepper (a little more than you think). Do not degrease, you want a fatty full flavored stock. Set aside.

2-    STARTING THE FILLING.-  In a small saucepan, medium heat, melt the butter until foaming and add the flour. Start stirring the mixture and you'll see it start to become a thick paste, now add a small amount of the stock, like a ladle at a time, while you continue to stir constantly. We need to cook out the flour taste, don't let it stick to the bottom.

3-    ADDING MORE STOCK.-  You are basically making a "Veloute Sauce" which means not all milk but you need to make it "Nape" or very smooth without lumps, ok?  Once you see the mixture absorb all the stock you added at the beginning and is bubbling, add a little more and keep stirring. Once you've got a mix that looks like thick custard (pudding) you need to lower the heat to low and let it bubble for about 3-5 minutes, stirring now and then to keep it from sticking to the bottom.

4-    NOW WE'RE STARTING THE FILLING.- In a large saucepan over medium heat, add a couple of tablespoons of oil and add the leeks and carrot to soften, keep an eye on them. Now you can add the garlic cloves and add the wine. You will allow the liquid to reduce to almost dry "au sec" or the liquid to almost disappear. At this time you add the white sauce you made earlier into the leeks, carrot and peas plus the heavy cream too. You need to heat this up until it bubbles gently. 

5-    TIME FOR THE CHICKEN.-  Now, if you had time before and your chicken was cooled, you can shred the chicken so it's ready to join the reset of the ingredients in the white sauce. Taste it!! Season to your taste with Salt and Pepper and allow the filling to cool. Once it has cooled and you're done it's time to taste to insure the seasonings are good. Add the vinegar or lemon and mix in, add salt and pepper and mix in. Taste, taste, taste... There's no measurements since it's YOUR taste that counts, so add a little and add more if you need since you can always add but not remove, ok?

6-    HOW ABOUT THE PASTRY.-  Take you pastry (which should have been resting in the fridge after making it, right? Roll it out on a floured surface and scatter with some chopped Rosemary and Sea / Coarse Salt. Preheat your oven to 190 C or 392 F.

7- FINISHING TOUCHES.-  Place your first crust into your chosen pan and fit well without stretching the dough, insure it covers all the pan with leftover but cut to size. Brush the edges of the crust with the beaten egg so they will glue together. Take your cooled filling and fill your pan almost to the very top. Take your second pastry crust  and lay over your pie, press down gently to avoid pockets or air bubbles. Now bring the bottom crust up and place the second crust over and under the bottom crust, it will seem like a thick edge but both should come together and folded under the pan neatly. With your right hand, first and third finger with pastry between, use your left hand's second finger knuckle to make a "V" shape indentation into the pastry edge (it will look great). Brush the pastry with more beaten egg. Make cuts into the top of the pastry crust to allow air to escape and bake for about 20 minutes (or more) keep an eye on it to insure you get a golden crust and a bubbling filling.

Allow to cool about 10 minutes for the filling to set and to lower the heat so you can eat it. You can include a side dish or salad if desired. Serve and enjoy!!!

NOTE.- You can use this recipe as a guide for other filled pies, you can use meats, fish or all veg, it's your choice, just make sure each step is flavorful and rich. You can also make individual one crust pies in ramekins.

You can also make it faster if you wish by using a rotisserie chicken, store bought stock and pastry dough or frozen vegetables to make it a quicker preparation. Change the veg, suit your family's taste and come up with your version. It'll be great!!


Monday, July 20, 2020

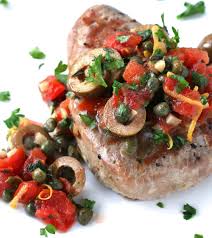
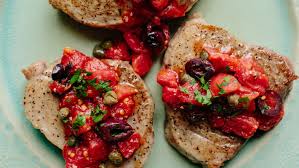
MASTERING THE BASICS.- Tuna Steaks Sicilian Style

MASTERING THE BASICS-  Tuna Steaks Sicilian Style:   Here is an easy and quick dish that can be a weekday entree or served to guests. High in nutrition and low in carbohydrates it can also become a part of your healthy offerings for your family too. Big on taste and nutrition, what more could you ask for?

Of course this preparation can also be made with other proteins since the sauce lends itself to this, you can also add tomato sauce and wine to make it into a "Puttanesca" type of sauce, add to pasta or rice and obtain a different dish, and due to the high flavor of this sauce you can pair it with beef, pork, chicken or other types of fish, so very flexible too.

You will need the following ingredients:

2 Ahi Tuna Steaks
4 - 6 Tablespoons Olive Oil
Salt and Pepper to taste
1/2 cup Onion, chopped
2 - 4 Garlic Cloves, peeled and finely chopped
3 Tablespoons Capers, drained (you can also add their vinegar if you like it like I do)
3 Tablespoons Olives, can be black or green, pitted and sliced
1/4 cup Raisins (optional)
1 - 1 1/2 cup Plum Tomato (Saladet) chopped in small cubes (you can use Cherry Tomatoes)
2 Tablespoons Flat Leaf Parsley, chopped
6 Basil Leaves, chopped
1/4 - 1/3 cup Pine Nuts (optional), toasted
1 Can of Tomato PASTE or if using a tube, about 1/2 can or 2-3 Tablespoons of Paste
1 Lb of  String Pasta, Spaghetti or Angel Hair or your choice- 1/2 the package, cooked and reserve at least 1-2 cups of the pasta water

PREPARATION:

1.-  In a medium pan, using medium high heat, add the olive oil to the pan and allow it to get hot, while you wait for this salt and pepper the fish on both sides.  Once the pan is hot add the fish and cook for about 3-4 minutes on each side. Once done, remove the fish to a plate, cover to keep warm. Do not clean the pan.

NOTE: If you are turning this dish into a pasta dish and want more of a tomato sauce, at this point you can add 1-2 Tablespoons of olive oil if the pan has gotten a little dry, add the tomato paste in order to fry it for a little while and remove the raw tomato taste. Once this is done you can continue the same order as in #2 and once you've been sauteed them for a while, you will add more liquid to make it a true sauce for pasta.

2.-  Using the same pan but lowering the heat to low, add the onions and stir until the become tender and lightly golden which only takes a couple of minutes, then add the garlic, capers, olives, raisins if using and the tomato and continue to stir for at least 3-4 minutes. The tomatoes should release their juice to make the sauce more liquid, if they don't you can add some stock, either fish or chicken, or use the caper or olive vinegar if you like it, you can also add white wine so its saucy. Taste the sauce to insure the seasoning is correct. Add 1/2 of the Parsley and Basil.

3.- Once the sauce is incorporated, if you're using pasta- Add the pasta at this time, you might need to add some of the pasta water to give it the texture that you need or not. Once you like the texture, add the pasta to the sauce, mix well. Top with the remaining Parsley and Basil once its on the plate.

If using wit fish or other protein, return the fish to the pan to warm up and once it's heated you can proceed to serve and top with the remaining herbs. Enoy!

Friday, June 19, 2020

TUNA STEAKS IN A SOY GINGER & LIME SAUCE-


One of my family's favorite dishes (yes, another one) that we have regularly because not only is it super easy but super fast with ingredients we always have on hand, plus 
being a healthy dish too.... 

Here is what you will need:

Tuna Steaks with Avocado, Soy, Ginger, and Lime.-

  • 2 big handfuls fresh cilantro leaves, finely chopped
  • 1/2 jalapeno, sliced (optional) or more (you can use other chiles too)
  • 1 teaspoon fresh ginger, peeled and grated
  • 1 garlic clove, peeled and grated
  • 2 limes, their juice
  • 2 tablespoons soy sauce (Kikkomann makes Gluten-free)
  • 1 teaspoon of sugar
  • salt and pepper
  • 1/4 cup extra-virgin olive oil
  • 1 - 4 Sushi-quality tuna steaks
  • 1 ripe avocado, halved and sliced
In a bowl, combine the cilantro, jalapeno, ginger, garlic, lime juice, soy sauce, sugar, salt, pepper, and the olive oil. Stir the ingredients together until well incorporated.
Place a skillet over medium-high heat and put a little olive oil on it, allow it to come to temperature. Season the tuna generously with salt and pepper. Lay the tuna in the hot oil and sear for 1-2 minutes on each side to form a golden crust. Pour 1/2 of the cilantro mixture into the pan to coat the fish. Serve the seared tuna with the sliced avocado and the remaining cilantro sauce drizzled over the steaks.
Notes: This is a very general direction for this dish, I'm sure you can see that many additions or substitutions can be made to suit your individual taste. Try different ingredients and you'll come up with your own version. We like raw tune so I sear it on a very hot pan for just 1 minute to leave the center cool, you can cook it the way that you like it, it's fine just be aware that it will change the texture so don't overcook, ok?
I hope you will enjoy it as much as we do, it's also perfect for company which would make an easy dinner to get on the table! 


Wednesday, April 3, 2019

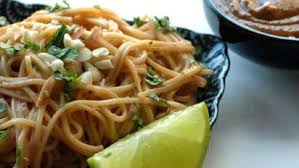
NEW! AN EASIER, FASTER RECIPE FOR "SPICY SZECHUAN NOODLES WITH PEANUT SAUCE"

This is the easiest, fastest, most foolproof way to get Szechuan Noodles with Peanut Sauce! Yahoo!!

You might have noticed that I have several versions of Szechuan Noodles, I love them that much, but over the years I've streamlined the recipe to make it easier and foolproof so it's done in no time flat but the result is just as delicious....

If you keep a wide array of Asian ingredients then this is an every day dish, but even if you have a limited pantry the ingredients are very basic and you will be able to use them for many other Asian Dishes as well.

You will need:

1 cup Peanut Butter (I use creamy but you can use chunky or make your own)
1/4 cup Soy Sauce (I use low salt version because I like it better than the heavier dark type)
1/4 cup Sesame Oil
3 Tbls Rice Vinegar
2 Tbls Garlic, finely chopped
2 Tbls Ginger Root, finely grated
1 1/2 tsp Asian Hot Sauce or Crushed Rep Pepper Flakes (I use Sriracha)
1 Tbls Hoisin Sauce (Plum Sauce)
2 Tbls Lime Juice, fresh (I use Persian Lemons because I love them)
3/4 cup Water
Salt as desired

1/2 cup Scallions, thinly sliced
Salted Peanuts, chopped (if desired)

1 Lb Noodles (you can use pasta, rice noodles, Udon Noodles or your choice)

Put the first group of ingredients in a blender (I use the glass of my immersion blender and it works perfectly) and mix until smooth. Taste it and make sure you like it or go ahead and add more peanut butter or hot sauce or lemon so it's perfect. Set Aside.

Boil water and once boiling put the pasta in the water until al dente. Drain the water and place noodles in a bowl. Add any extras (like the second and third group) or some of these extras:

Grated carrot, grated zucchini, beets, Sweet Red Bell Pepper, Green Bell Pepper, Spinach, Cilantro Leaves, or your favorite vegetables or greens. Good additions are also Cooked Pork Meat Strips, Rotisserie Chicken Strips, Cooked Shrimp, Shredded Crab meat or your desired adds.

You can see how flexible this recipe can be, it can go from Vegan to full blown protein rich, it's up to you to create your favorite version or you can do what I've done in the past and use it like a good old refrigerator cleaning dish and use up leftovers. Still great! You can have these cold, room temp or hot too.

NOTE: If you're not going to use it right away you can put it in a tightly sealed container and keep it in the fridge for up to a week, or if you want to keep for a quick dinner option some night then you can put it into a freezer bag or freezer container and keep it for a longer period.

Hope you try this easy recipe and create your own masterpiece! Enjoy!!

Tuesday, December 4, 2018

TERIYAKI SALMON BOWLS.- Everyone loves these!

TERIYAKI SALMON BOWLS.-  This has to be another one of those dishes that everyone loves and has fond memories of, right? Most people just go ahead and buy a bottle of Teriyaki Sauce at the market when it's a very easy sauce to make and it keeps a long time in the fridge so you can use it on many other things.... like chicken, beef, pork, fish and vegetables or fruit. How about when you're using the grill? Of course! Throw some veggies, some pineapple slices YUM and anything else you can think of.... good eats!

Anyway, very easy to make, keeps a long time and people like it plus goes well with all types of foods, need more reasons?

You'll need:

To make about 1 cup of Teriyaki Sauce: You can double ingredients or more:

1 cup Japanese Soyu Sauce (Soy Sauce), regular dark
1/2 cup dark brown sugar
1 cup Mirin, a Sweet Japanese Rice Wine like Sake but milder (you can add sugar to sake if you want and a little water but it's widely available in the Oriental Foods aisle at the market
1/2 cup Sake, your choice

Bring all ingredients together in a small saucepan. Bring it to a boil over medium-high heat, reduce the heat to a simmer and cook for about 20 minutes or until it thickens enough to coat a spoon. Remove from the heat and either use at once or cool and place in an airtight container in the fridge.

NOTE: I've also added other flavorings to this as time has gone by like, orange juice, finely chopped ginger, different crushed peppercorns, sirasha, etc. You can test it out and see what you like.

Anyway to make the TERIYAKI SALMON BOWL once you have the Teriyaki Sauce, you'll get:

White Rice ready, any kind you like (you can also use Brown Rice)
Salmon Fillets, dry with paper towels on both sides
salt and pepper
some oil for cooking
an avocado, sliced
some sliced cucumber
black and white toasted sesame seeds
green onions or scallions cut in small pieces.

In a fry pan with a little oil, cook the salmon fillets (the size of your bowl or strips) only enough to get a golden color on the outside but leave some pink on the inside since you don't want to overcook the fish, ok? NEVER OVERCOOK FISH!!!!

Turn the fillets to briefly cook the underside. Once done, remove and set aside.

Put rice in the bowls, top with sliced avocado, cucumber and scallions. Top this with the Salmon Fillet and cover with s large soup spoon of the Teriyaki Glaze, spreading it evenly with the back of the spoon. Sprinkle with the Sesame Seeds. Serve immediately. Enjoy!

You get the idea, add more veggies, noodles, different rice (like black rice YUM), proteins, legumes, fruit, whatever you like better or have on hand. Believe me, it will be great!

Also, once you have the sauce in the fridge, this can become an easy and quick weeknight dinner that will really satisfy and delight you!


Sunday, August 19, 2018

POLLO CON CAPPERI E ACCIUGHE: Chicken with Capers and Anchovies!

POLLO CON CAPPERI E ACCIUGHE: Chicken with Capers and Anchovies, from Italy with love when you try this amazingly flavorful dish, you'll be surprised by how much flavor you can bring to chicken, we love it (even my husband and son who are not big chicken fans), great to make and eat!

This is a very easy dish to make, plus it can be a very quick dish to get on the table. I've regularly made changes to this basic recipe and changed the proteins since it's great with Veal, Beef, Pork, Fish and you can serve it as a Main Dish as is or over pasta or rice too! You can use a whole chicken or just drumsticks, wings or in my case I only used breasts, de-boned, skinless and sliced into scallopine, but you could also turn them into thin Braciole, Rollatini or Involtini as well (thin pounded steaks rolled up). With a few very simple changes you can make Chicken (or other protein) Marsala or other wine sauce, or if you don't want to add a wine or alcohol it can be made with chicken stock, a thickener, some herbs or veggies and you're all set!

To make this dish, you will need:

2 whole double Chicken Breasts with bone, if you know how to de-skin and de-bone, otherwise use       4 whole Chicken Breasts, sliced through the middle to make 8 thin fillets which will be pounded
1 cup Flour
1 tsp Salt
1 tsp Black Pepper
1/4 tsp Cayenne Pepper (optional)
1/4 cup Olive Oil
4-6 (or more) Tbl Butter
6-8 Garlic Cloves, chopped fine
1/4 - 1/3 cup Capers with some of its liquid
8 Anchovy Fillets, if salted then rinse off salt
2 Lemons, juiced fresh
1/3 cup White Wine (or your choice), I used Sherry
1 Tbl Parsley Leaves, chopped fine

You will need a large pan to hold all the chicken. Take the chicken and place between plastic sheets and pound until thin. In a bowl add the flour, salt, pepper and Cayenne and mix well. Dredge the meat through the prepared flour, shake off the excess and hold until the pan is hot.

Place the pan on medium-high heat, add some oil and butter and once hot start searing the meat. Turn after about 2 min (they will finish cooking in the sauce later), place in a dish and hold until all the meat has been seared. Once the meat is seared, then you might need to add more oil and butter, now add the garlic, capers and anchovies and saute until the anchovies have melted. Pour in the lemon juice and wine if using, now you add the chicken to finish cooking while lowering the heat to low. If using whole chicken or bone-in chicken then cover the pan and allow to cook for more time to cook the chicken completely but if using scallopini then 5 minutes should more than do then uncover the pan so sauce will thicken a little.

To serve, sprinkle the Parsley Leaves over top. Enjoy!

NOTE: For the Braciole, Involtini or Rollatini then once the meat has been pounded down, or you can even use vegetables sliced thin, think zucchini / eggplant / pasta, etc, take your filling material (like Mozarella and Prosciutto, Sage, Ricotta, etc) then roll them up, secure them with toothpicks or cooking twine, sear as usual and then finish cooking in the sauce.

I can also add more spin to give you even more flexibility, that sauces could also be Tomato, either smooth or chunky, white sauce or any sauce you want to use that will work well with your choice of protein and veggies or filling. I've used Poblano Peppers, Red Bell Peppers, Cabbage, Skirt Steak, they're all great!

So there you go, hope you'll try it and see how this can add to your family's favorite dishes. Surprise someone today! You'll be glad you did! Enjoy!


Tuesday, August 14, 2018

PAN SEARED TUNA STEAKS WITH MANGO CHUTNEY.-

PAN SEARED AHI TUNA STEAKS WITH MANGO CHUTNEY.- Looking around town for a variety of fish and seafood I found some Ahi Tuna Steaks at my latest Costco outing and decided to try it and see if this could be an option for us. Reasonable price, flash frozen, individually wrapped so you can use one or more which I like and found they looked alright and this is the resulting dish.

I do a variety of flavors of Chutney since it's fruit based and whatever you have on hand will do but ran into this suggestion and decided it sounded really great and it was. I can also see canning it for later use too if I ever get industrious. There is some work involved but definitely worth it, believe me.

The Ahi Tuna defrosted really well and the fish was soft and supple. Will try making Poke next to see if they can be used raw as well which is what we like the best, but today it's pan seared so let's go.

For this preparation you will need:

2 - 4 Tbl Olive Oil
Ahi Tuna Steaks, I used three, one for each of us
2 Mangos, ripe and fillets cut into 1/2 inch squares
2 Onions, medium sized, chopped into 1/2 squares
1 Tbl Ginger, fresh, grated or finely minced
1 Tbl Garlic, fresh, pressed or finely minced
1/2  cup Orange Juice, fresh
1 Tbl Brown Sugar or Cane Sugar, your choice
1 Tsp Salt
1/2 - 1 Tsp Black Pepper, fresh ground
1 Jalapeño / Serrano Pepper, de-seeded, chopped very fine or crushed red pepper flakes, your choice
2 Tsp Mint Leaves, cut in chiffonade
1 Tsp Cilantro Leaves, chopped, as topping (optional)
-or-
1 Tsp Thyme Leaves, finely chopped
1/2 Tsp Dill Leaves

First you will prepare the Chutney since that takes more time while the steaks cook quickly.

Place some oil in a large saute pan over medium heat and once the pan is hot add the onions and cook stirring often, for about 8-10 minutes so they become a little golden, at this time add the ginger and keep stirring for about 2-3 minutes. Now add the garlic and mango, lower the heat to low for about 8-10 minutes.

Now add the orange juice, sugar and the pepper you've chosen. Salt and pepper to taste.  Cook for about 4-5 minutes so the orange juice is reduced some. You want it moist but not liquid. Keep stirring now and then. Remove from the heat and add the herbs.

We can cook the fish at this point so while you get a saute pan very hot over med-high heat, dry the steaks really well with paper towels then salt and pepper them liberally on both sides. When the pan is hot, add some oil to the pan and lay the steaks on the hot pan.

To sear the steaks and leave a pink center which is commonly how Ahi Tuna is served, cook for about 2 minutes per side or until the outside is a nice browned color, not dark brown unless you want a grey inside the fish. The more you cook, the less moist the fish will be.

To serve: Place a mound of Chutney on the plate and lay a steak on the side of the Chutney.

I made Bacon-Almond Green Beans as a side dish with this and it was quite lovely. I hope you will try and enjoy!

Note: I made more of the Chutney, went ahead and placed half in a jar in the refrigerator and we've enjoyed it with chicken, as a complement to sandwiches and even used it on toast. We are keeping this dish, it was really good!


Tuesday, July 31, 2018

LARB, CLASSIC THAI STREET FOOD AND A FRESH CUCUMBER SALAD.....

LARB, CLASSIC THAI STREET FOOD AND A FRESH CUCUMBER SALAD.- With the hot weather sometimes it's hard to stay in the kitchen for long periods, so I cook in stages for the most part but I have been put off from baking (which makes me sad), so trying to come up with quick meals we like that will still deliver the flavor we expect but don't kill me. I swear, I take breaks because I'm dripping, it's exhausting and uncomfortable and I don't like it. I've got all the doors open to the front of the house and the back garden door in the kitchen to get any breeze at all but with high humidity, there's not much you can do just stay in the cool, dark and wait for fall.

Today, after watching a video from this Thai lady I like (she cooks in her garden on a small brazier while the chickens walk around, it's nice) I decided to take a little trip to Thailand and make some flavorful food. We were going to the market so I got what I needed and started with Larb, the unofficial national dish of Laos and the Isan Region of Thailand. A meat salad that can be eaten raw or cooked and made with almost any type of protein or made in vegetarian style, so very flexible, easy to make, yummy to eat, fast and fun to eat. I used ground pork today and we'll use Butter Lettuce Leaves as the vehicle. Let me tell you what you'll need:

LARB.- The most common way to make it is cook the protein then take it off heat and add the flavorings since it's usually eaten at room temperature.

2 Lb Ground Pork
1 Tbl Chili Flakes (today I used Pepperoncino)
1/2 Tbl sugar
1 - 2 Tbl Fish Sauce
1 - 2 Limes, juiced
4 - 5 shallots, sliced fine
1/3 cup Cilantro leaves, finely chopped
1/3 cup Mint Leaves
3 - 5 Green Onions, sliced fine
Butter Lettuce leaves, rinsed and clean
Peanuts, chopped, optional as a topping

Add the pork to a sauce pan or fry pan and cook completely. I don't drain the juices but can if you want. Leave the pork in the pan but take off the heat.

Add the chili flakes, fish sauce, sugar and the lime juice. Stir well. These quantities are just as a guide, feel free the put more or less depending on your taste, so taste it frequently.

Now add the shallots, the green onions, cilantro and mint leaves, toss it all really well. Mix from the bottom to get the spices and juices well distributed on the meat.

To serve, use lettuce leaves as a "tortilla" and make tacos with the Larb. As you can see this is low carb too. You can top with the chopped peanuts or other nut or bean sprouts if you like.

Try all the food combinations you can think of on this dish to find your favorite: beef, chicken, pork, duck, fish, seafood, mushrooms or any type of vegetables too.

Hope you enjoy this dish as much as we do. Enjoy!

============================

THAI CUCUMBER SALAD.- A change from Green Papaya Salad but just as fresh!

2 garlic cloves, peeled and pressed
Thai Chilies, depends on how hot you want it (they're very hot)
2 Tbl Roasted Peanuts, chopped
1 Tbl Fish Sauce
1/2 - 1 Tbl Palm Sugar or use brown sugar
1 - 2 limes, juiced
1 tomato, chopped very fine
2 cucumbers, peeled and shredded
2 carrots, peeled and shredded

Toppings:
1 - 2 Tbl Cilantro leaves, chopped fine
1 - 2 Tbl Mint Leaves, chopped fine
Green Beans
Green Cabbage
Roasted Peanuts

Put the garlic cloves and chilies in a mortar and pound well. Add the palm sugar and fish sauce, lime juice into the mortar and work well so all is well incorporated.

Shred the cucumbers and carrots either in a box grater or food processor and place in a bowl. Once the dressing in the mortar is well combined add to the cucumber carrot mix and combine well. Add the cilantro and mint leaves, toss again. You can use the other toppings as desired at service.

This salad as well as the Green Papaya Salad make good side dishes to the Larb, you can also serve with some rice.

I hope you enjoy these dishes!


Saturday, July 28, 2018

Seared Tuna Steaks with Soy Lime Noodles.-

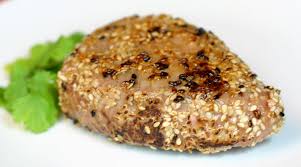
Seared Tuna Steaks with Soy Lime Noodles.- I had found some pretty nice Ahi Tuna Steaks at one of my regular markets and decided to make a nice dinner for us and this is what I decided on, let me tell you the results are worth repeating. Once you have your ingredients ready, this meal comes together very quickly:

First find the Ahi Tuna Steaks, one per person since you will be coating it with sesame seeds and then it will be lightly seared. We had Tuna Poke the other day so I needed something different and this sounded just right (and it was YUM). For this recipe you will need:

4-5 oz individual tuna steaks
Salt and fresh ground pepper
1 Tbl of Sesame Seeds per steak, can be any color your choice
1 Tbl olive oil
Asparagus Spears, cleaned (optional but are nice sauted with the fish)
1/4 cup Soy Sauce
1/4 cup water (I used the pasta water after removing the noodles)
2 Tbl fresh Lemon Juice
Egg Noodles or Pasta, preferably spaghetti but your choice
2-4 Green Onions, cleaned and sliced thin
2-3 Tbl Cilantro Leaves, finely chopped

Pea & Bacon Salad (see post on this blog for recipe, prepare and keep cold in fridge)

Instructions.-
Pat dry the tuna steaks on both sides, season on both sides with salt and pepper. Put the sesame seeds on a plate and cover the steaks well on both sides with them, you can press down lightly. Heat the oil in a nonstick pan over medium-high heat until hot. Sear the steaks for:
Sear for 30 seconds on each side for RARE
Sear for 1 minute per side for MEDIUM
Sear for 90 seconds to 2 minutes for WELL DONE
Once seared remove the steaks to a plate. Now add the asparagus and any sesame seeds that were left over on the plate that didn't get seared with the steaks to the pan and cook over medium heat for about 30 seconds. Remove from the heat. Place water in a large pot to boil on high heat, add some salt to the water. Once boiling, add the pasta and keep an eye on it.

In a large bowl add the soy sauce, water (or some pasta water) and lime juice. Add the noodles once they are "al dente" along with the green onions and toasted sesame seeds, toss to combine well. Now you can plate the noodles, you can cut the steaks in half or in strips for service or just leave whole. Put the tuna on top of the noodles. Serve the Pea & Bacon Salad on the side and serve. Enjoy!!